Choose from 12 free printable pumpkin carving stencils, including friendly faces, a vampire grin, a bat, a ghost, and fall silhouettes. Download one design or the complete PDF pack, print the size that fits your pumpkin, and use the black shapes as your carving guide. No email signup is needed.
Download all 12 pumpkin carving stencils — free PDF
Included: 12 original designs in two sizes, 24 stencil pages plus a cover and instructions. US Letter paper, black-and-white patterns, individual PDFs, and printable JPGs. Free for personal and classroom use.
Jump to: Pumpkin faces · Halloween shapes · Printing and sizing · Carving instructions · FAQ
Easy and Scary Pumpkin Face Stencils
Start with a face if you want a traditional jack-o’-lantern. Easy patterns have fewer openings or simpler edges; medium patterns need more careful turns or spacing. The rating describes the pattern, not a child’s readiness to use carving tools. Adults should handle the cutting.
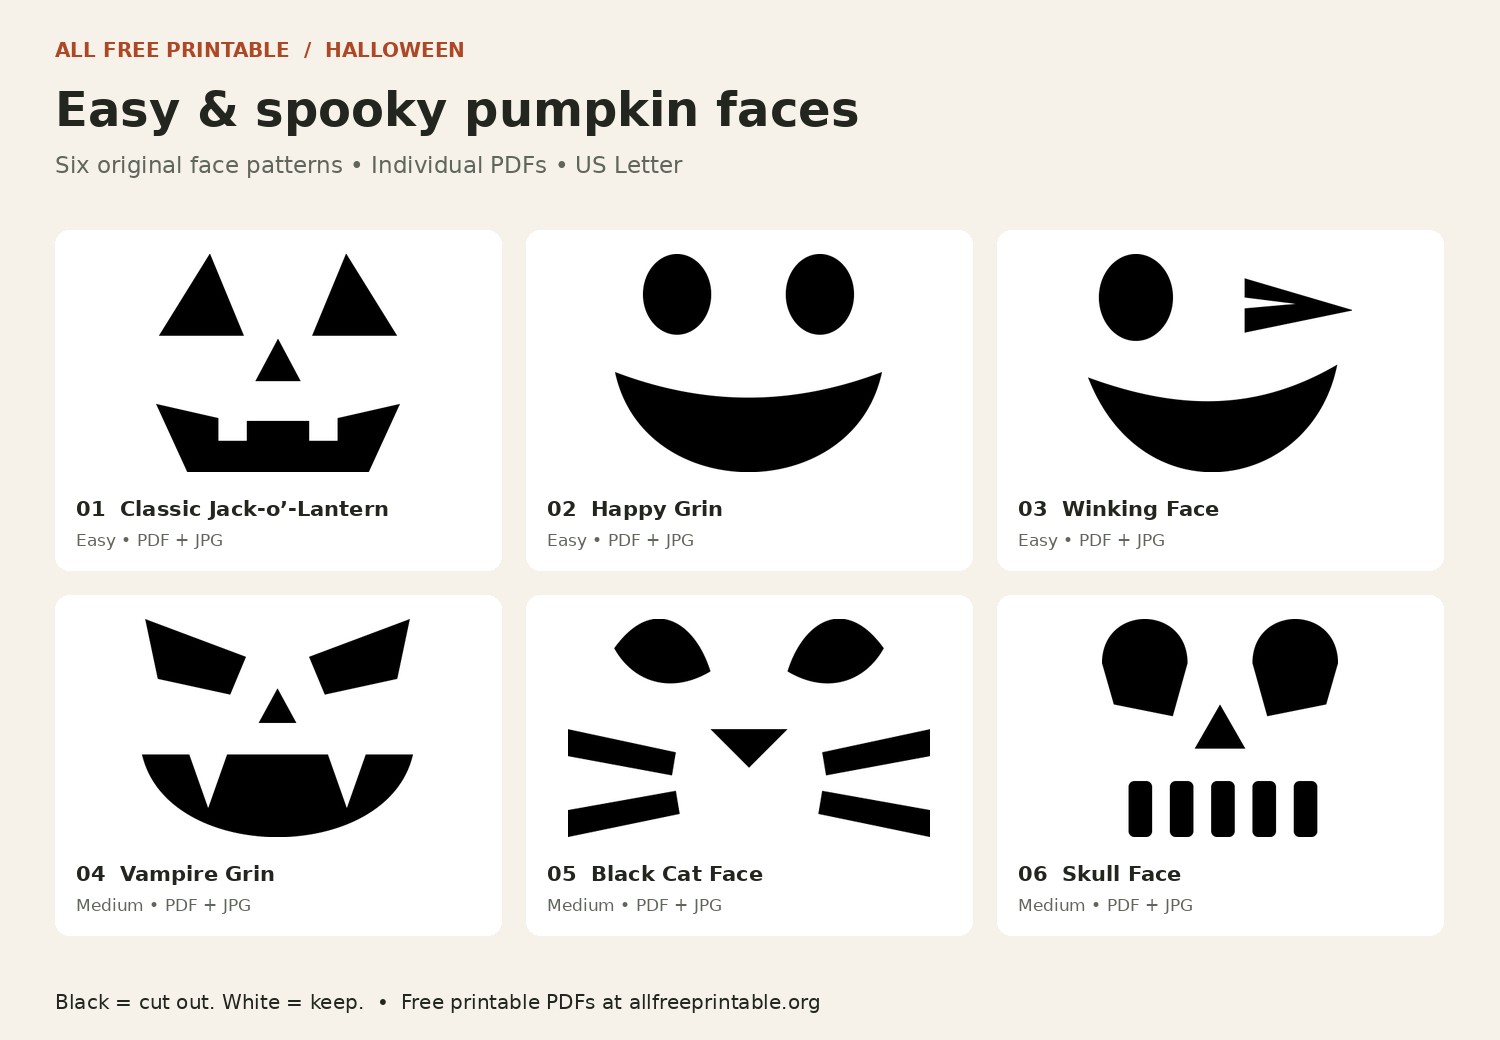
1. Classic Jack-o’-Lantern
Easy. Four broad openings; a good first pattern. Download Classic Jack-o’-Lantern PDF · Printable JPG
2. Happy Grin
Easy. Rounded eyes and a wide, gentle smile. Download Happy Grin PDF · Printable JPG
3. Winking Face
Easy. One open eye and one bold wink. Download Winking Face PDF · Printable JPG
4. Vampire Grin
Medium. Keep both fangs attached to the upper lip. Download Vampire Grin PDF · Printable JPG
5. Black Cat Face
Medium. Separate whiskers keep the cheeks connected. Download Black Cat Face PDF · Printable JPG
6. Skull Face
Medium. Separate teeth give this face its spooky look. Download Skull Face PDF · Printable JPG
Bat, Ghost, Witch Hat, and More Halloween Stencils
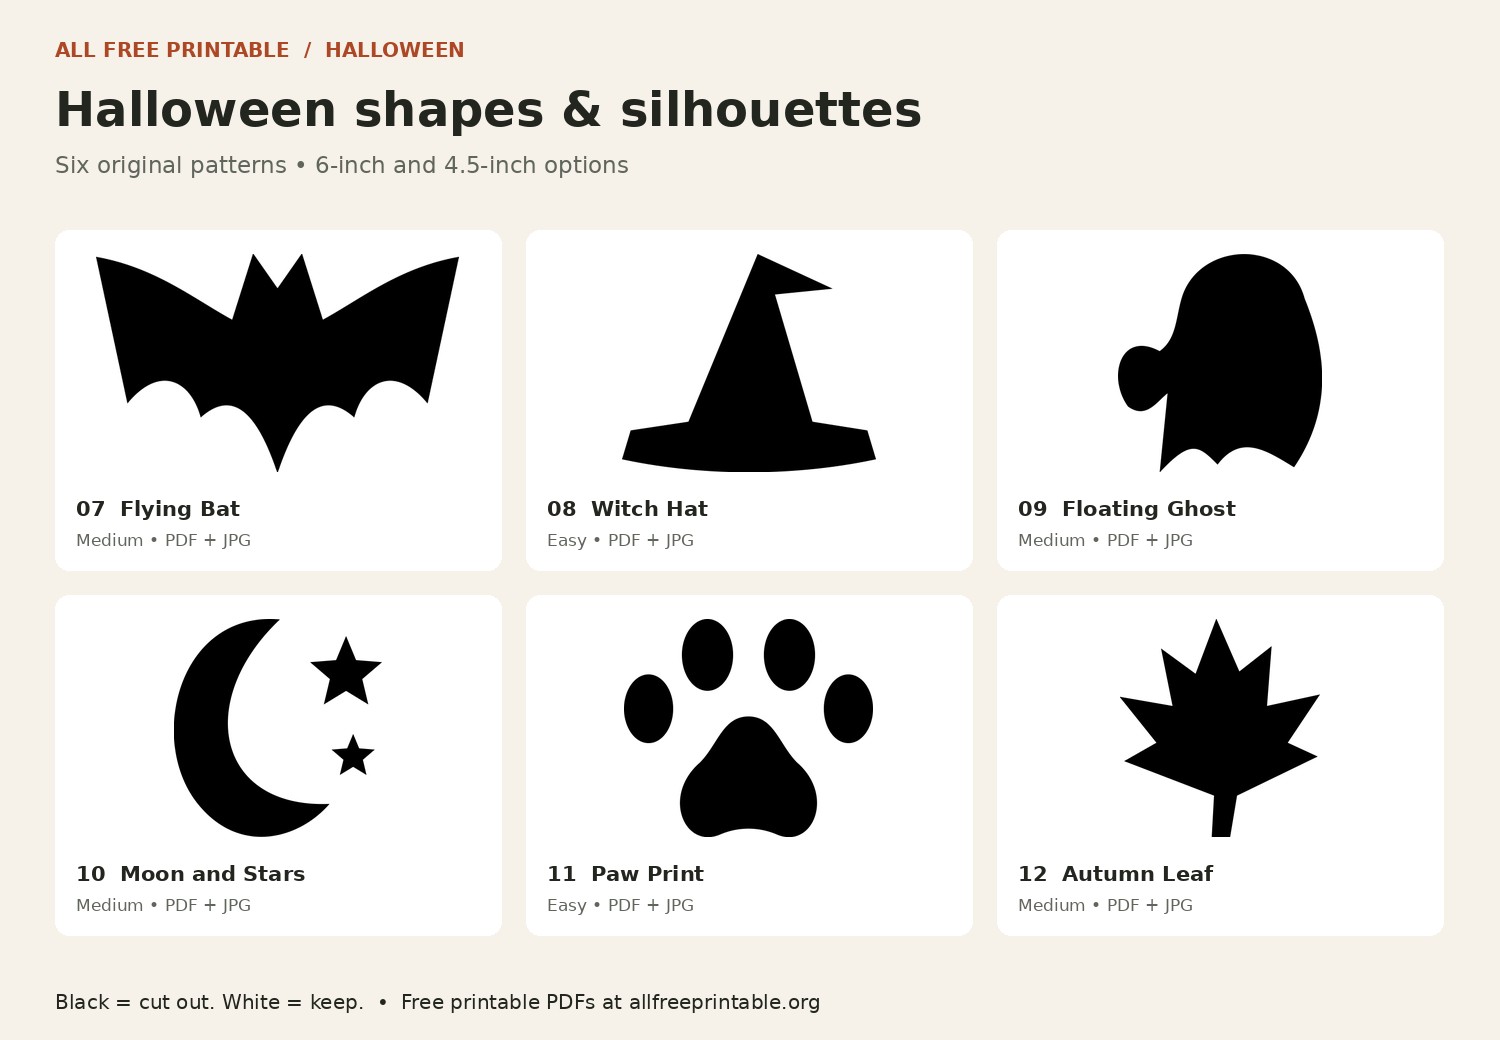
Prefer a shape instead of a face? These patterns make one main motif, with separate openings for the moon-and-stars and paw designs. The ghost is a solid silhouette with no facial details to leave unsupported. Keep a generous border of uncut pumpkin around every pattern.
7. Flying Bat
Medium. One silhouette with broad, scalloped wings. Download Flying Bat PDF · Printable JPG
8. Witch Hat
Easy. A single solid cutout with a crooked tip. Download Witch Hat PDF · Printable JPG
9. Floating Ghost
Medium. A simple ghost silhouette with a waving tail. Download Floating Ghost PDF · Printable JPG
10. Moon and Stars
Medium. Separate the moon and stars with uncut pumpkin. Download Moon and Stars PDF · Printable JPG
11. Paw Print
Easy. Five rounded openings for a pet-themed pumpkin. Download Paw Print PDF · Printable JPG
12. Autumn Leaf
Medium. Follow the broad lobes; take care at the stem. Download Autumn Leaf PDF · Printable JPG
How to Print and Size Your Pumpkin Stencil
Measure the smooth area where you will carve, rather than the distance around the whole pumpkin. Each individual PDF has a 6-inch design on page 1 and a 4.5-inch design on page 2, measured along its longest side. Width and height are printed underneath each pattern.
- Open the PDF and select only the page you want. Use ordinary US Letter paper, 8.5 × 11 inches, and single-sided printing.
- Select Actual size or 100%. Measure the printed calibration square: it should be exactly 1 inch.
- Hold the paper against your pumpkin before transferring. Leave room around the design and away from the access opening.
- If neither size fits, adjust the print scale. Shrinking the pattern also narrows its uncut gaps, so choose a simpler design when space is tight.
For example, printing a 6-inch pattern at 75% produces a 4.5-inch pattern. Its calibration square will also shrink to 0.75 inch. On A4 paper, use Actual size and check the preview for clipping. The PDFs are best for predictable dimensions; photo-printing apps may crop or resize JPGs automatically.
In the complete pack, pages 1–2 are the cover and instructions. Design 1 starts on page 3, and every design takes two pages. The instruction sheet lists the page numbers so you can print one pattern without printing the entire collection.
How to Use a Printable Pumpkin Carving Stencil
Gather your printed pattern, a pumpkin with a firm carving surface, tape, a scoop, a transfer tool, a pumpkin carving saw, and a battery-operated LED light. Work on a stable surface with dry hands and tools.
- Prepare the pumpkin. An adult makes an access opening and removes the seeds and loose pulp. Keep the outer surface dry so tape can stick.
- Attach the paper. Trim excess blank margins. Small snips around the outside paper edge can help it sit against a curved pumpkin without distorting the design.
- Transfer the outlines. An adult traces or marks the boundaries of the black shapes with a suitable transfer tool. Remove the paper and check that every outline is visible.
- Cut the black shapes. Use a pumpkin saw slowly, following its instructions. Keep the white gaps intact and avoid forcing the blade around sharp corners.
- Light the design. Place a battery-operated LED inside. Keep the pumpkin stable and the light’s battery compartment secured.
For the vampire pattern, the two white fangs stay connected to the upper lip. For the skull, keep the narrow strips between the teeth. If a section feels fragile, stop and simplify that part rather than widening the opening.
Common Printing and Carving Problems
- The pattern prints too small: check for “Fit,” multiple pages per sheet, or an automatic photo layout. Compare the calibration square with a ruler.
- The paper wrinkles: reduce the blank border and reposition the tape. Do not stretch the design over a deep ridge.
- Parts look disconnected: cut only the black shapes. An outline around the whole face is not part of these templates.
- The download opens in a browser: use the PDF viewer’s download or print button. On a phone, the share menu may contain the save option.
Printable Pumpkin Carving Stencils FAQ
Are these pumpkin carving stencils free?
Yes. All 12 designs are free to download and print for personal and classroom activities. Share the article link with others instead of reuploading or selling the files.
Which stencil is easiest for beginners?
Try Happy Grin or Classic Jack-o’-Lantern. Their separated eyes and mouth make the areas to remove easy to identify. The witch hat is another option if you prefer one large cutout.
Do I cut out the black or white areas?
Cut out the black areas of the pattern and leave the white areas as pumpkin. The text, page edges, and calibration square are printing aids, not carving lines.
Can children use the templates without carving?
Yes. Children can choose a design or use it as inspiration for drawing on a pumpkin with markers. An adult should handle sharp tools and the carving.
Have the patterns been tested on real pumpkins?
These original digital patterns have been checked for print layout and disconnected white sections, but have not been physically test-carved. Results depend on pumpkin shape, wall thickness, tools, and technique.
Can I print just one stencil?
Yes. Use its individual PDF link and print page 1 or 2 for your preferred size. The JPG link gives you the standard-size page as an image.
More Pumpkin Printable Ideas
For another fall activity, explore our pumpkin cut-out ideas or pumpkin eyes and mouth ideas. Keep this collection handy when you want a ready-to-print carving pattern.